Sunday, January 29, 2012

Kool-aid dyed yarn!

A few weeks ago, when it was actually cold, I loaned KB my felted slippers and offered to make her a pair. The thing is, the only colored yarns I have on hand anymore are in small supply, or in 'girly' colors that she's grown out of. However, I had four skeins of Lion Wool (100% wool, worsted weight) in a natural 'Winter White' color on hand, which I had purchased for the specific purpose of Kool-aid dyeing. I also had plenty of different colors of Kool-aid on hand, which I'd purchased for some tie-dyeing that never quite happened last summer due to the weather and her friend AB's schedule.

The process itself is pretty simple, and can be found just about anywhere online. We took two chairs and set them on either end of the dining room, and KB wrapped two skeins of yarn around them, creating one really long skein. AB did the same with two more skeins. Each of them used rubber bands to tie off where they wanted the color changes to go, and we set them to the side for the next time she could come over.

AB came back over today, and we got to work as BB's tea party was wrapping up - speaking of, it was absolutely adorable, and she and her friend had a great time. At any rate, we promptly got to work on mixing up Kool-aid in mason jars, and putting them into the pressure cooker, along with a couple inches of water.
Blue and green are the fashionable colors for tweenie girls these days.

Once they had mixed up all six jars, with one packet of mix each, we snipped the rubber bands off the yarn and started stuffing them into the jars.

Gotta make sure to dunk the yarn that won't fit into the jars in the dye, too, or you'll have white patches.

Then I turned on the stove and put the lid on. I used the pressure cooker because it's the only pot we have on hand that can fit six quart sized mason jars.

Notice that I didn't seal the lid down, or use the weight. It just needed to be near-boiling, then cool.

It took about 20 minutes for the water to get really hot, and then another half hour or so for enough of the dye to soak in to our satisfaction. Not all of the blue soaked in, but there was enough color saturation and lots of green saturation, and everyone was happy.

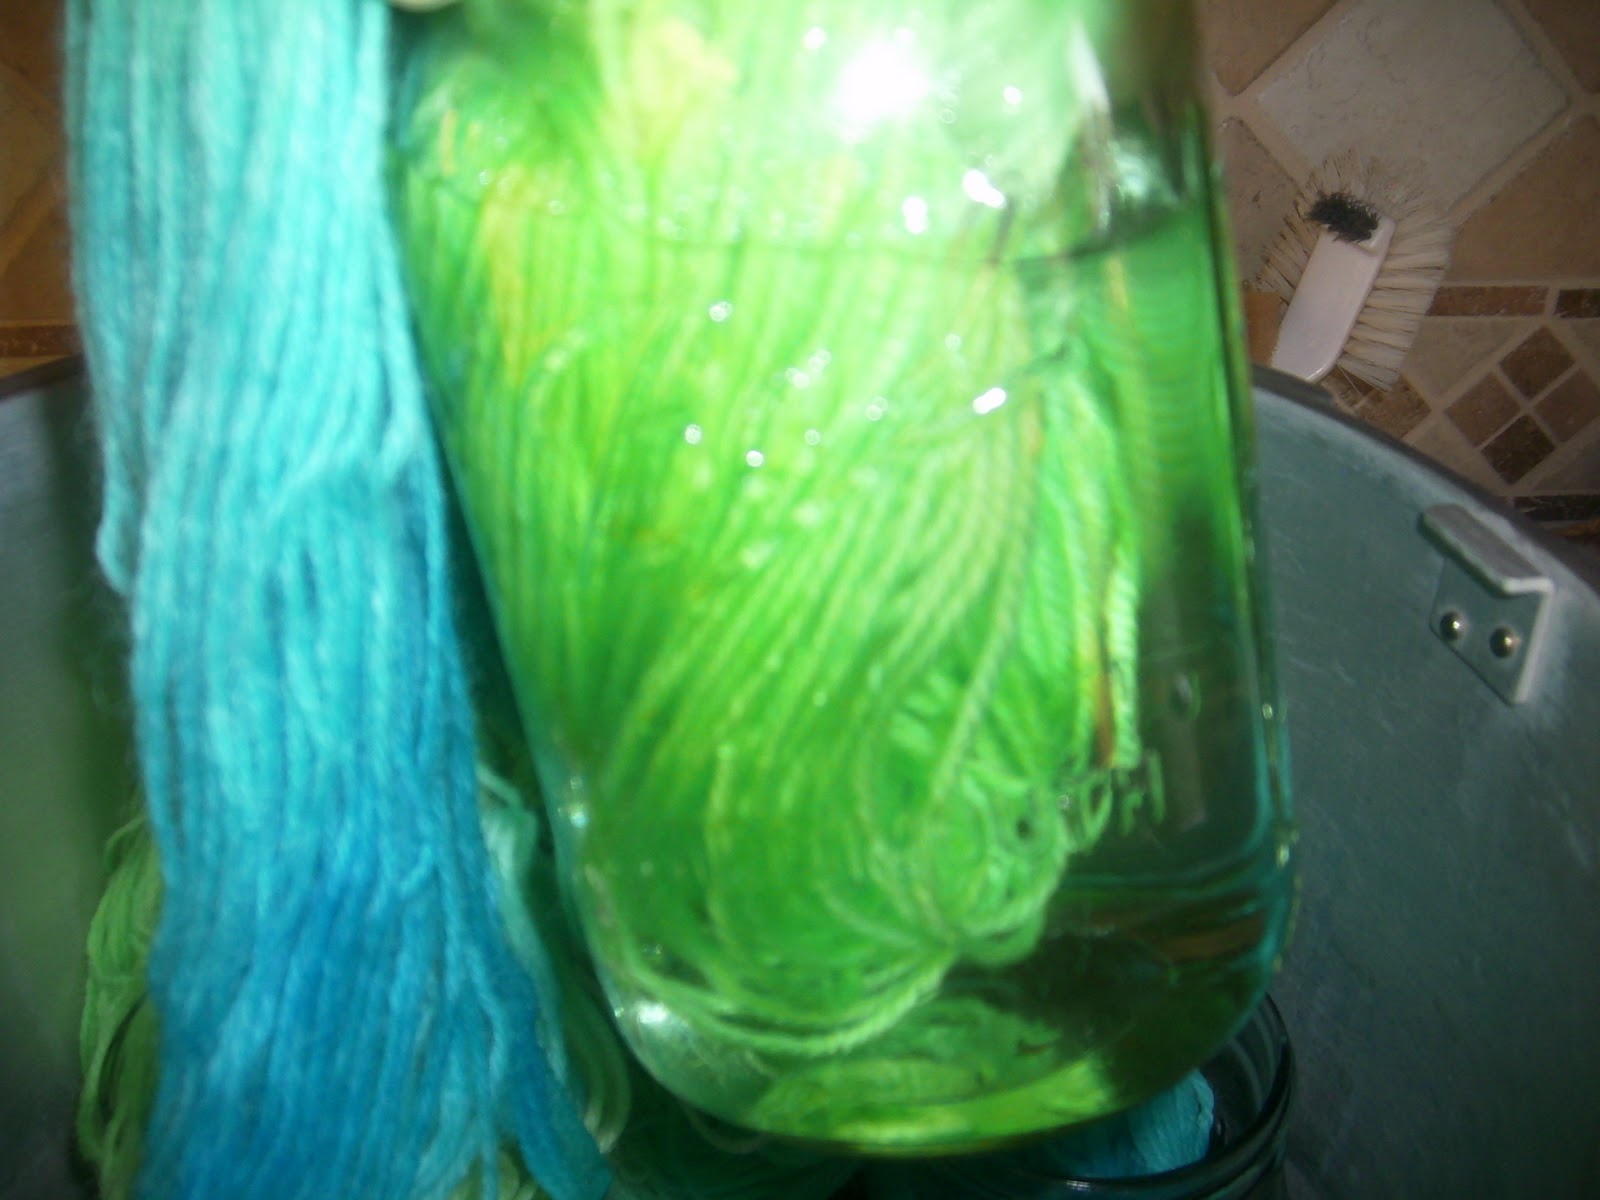
It's hard to tell from this picture, but the water was almost clear. The green color had been soaked into the yarn.

After all of that, the yarn went into the sink and was squeezed out, and first rinsed with hot water, then fairly warm water, then lukewarm water. Trying to cool it off too fast would've resulted in major shrinkage - and it's not time to felt the yarn just yet. After squeezing it out pretty thoroughly, the yarn got hung up on the back porch to drip for an hour or so.

The blue of the yarn almost matches the blue of the pool... almost.

As AB and KB were heading out for the day, I decided that I didn't want damp yarn to be left outdoors to freeze overnight, so I brought it back inside and hung it on the towel bar in my bathroom. Besides, it's much warmer inside, so hopefully that'll make it dry faster. I'm pretty anxious to wind this stuff into balls and get started on their slippers and whatever other projects they dream of for this yarn!

This picture doesn't do the colors justice. They're gorgeous.

It's just too pretty. I'm thinking of setting up a fan in there to nudge the drying process along.

Saturday, January 28, 2012

52 weeks of baking, Week 4: Flower cupcakes, plus banana and blueberry fillings!

BB is having a tea party tomorrow. She's been excited about it for weeks, and has gone to a great deal of trouble to make up invitations for her friend who lives a few doors down from here. A couple of weeks ago, I found a flower-shaped cupcake pan at Hobby Lobby, which I'd intended to use for this tea party. Unfortunately, I didn't manage to hide it before BB showed up at the house, so the surprise was ruined, and she's been asking me about the flower cupcakes every single day since.

The pan itself is a neat thing - you put cupcake liners into it, fill the liners all the way up, and bake for five minutes. After the five minutes is up, you add another big spoonful or so of batter in, and make sure it gets into the corners of the mold. Once they're done, you let them cool for a minute, and out come super-cute flower-ish cupcakes!

Why didn't they have fun shapes for cupcakes when I was a kid?!

Of course, I couldn't -just- do cupcakes, since this is frosting/filling week. BB's favorite fruit is banana, and her friend's favorite fruit is blueberry, so I decided to make filling for their cupcakes (the adults get plain ones, because they're fuddy-duddies). It really wasn't difficult at all - fruit, a little liquid, a little sugar, and some xanthan gum to thicken them up to be the right consistency for filling.

Xanthan gum: a true victory of food science

For the cake itself, I used this recipe, which turned out to be delightful. A petal from one of the cupcakes was a bit cracked, and my sister grabbed it. I managed to get a few bites, and was very impressed - this recipe is a keeper! For the icing, I took my mom's advice and used a mixture of cream cheese and shortening, plus over a pound of powdered sugar and some almond and butter flavoring. The result was a good consistency, and the almond and butter flavorings definitely helped balance out the flavor. It tastes like buttercream, but with a little something more.

Now, as a disclaimer, I have to say that this is my first time actually decorating a cake. Icing a cake, in my experience, has involved slathering cream cheese or caramel-coconut-pecan icing all over a couple of layers and hoping that they aren't too lopsided once I'm done. Sometimes I might sprinkle nuts across the top, but that's about it. The only time I've ever used a piping bag has been to fill doughnuts. So, around 7:30 PM I decided that the cupcakes were cool enough, and was ready to settle down and practice my icing techniques.

Except that isn't what happened. What did happen was my mother and I coming to the realization that her decorating kit, tips, couplers, colors, and all, had mysteriously vanished, most likely to my sister's house. So, I found myself on a last-minute run to Wal-mart, where I managed to pick up the tips, colors, and bags that I needed. Finally, around 9:00 PM, I was finally able to get started on my very first cupcake. It turned out well, I think, and so I kept on going. There are still a few more plain ones to ice in the morning, but I managed to get enough finished for the tea party even if I oversleep. Not too shabby, I say.

The pink flower is plain, the yellow has banana filling, and the purple has blueberry. I'm sure you guessed that already.

Banana Cupcake and Doughnut Filling
  • 1 very ripe banana
  • 1 splash (about 2 tbsp) half and half
  • 3/8 tsp xanthan gum
  • 1/2 tsp banana extract
  • 1 tsp sugar
Using small food processor, puree bananas, add half and half. Add small amounts of xanthan gum at a time (about 1/8 tsp), pulsing until the filling obtains desired thickness. If filling becomes too thick after setting, stir or whisk in additional half and half.

Blueberry Cupcake and Doughnut Filling
  • 1 c frozen blueberries, rinsed
  • 1/2 c water
  • 1/2 c sugar
  • 1/2 tsp xanthan gum
Simmer blueberries over low heat until soft. Stir in sugar and continue to simmer another 15 minutes. Puree mixture and process through a food mill, allowing to cool to room temperature. If filling becomes too thick after setting, stir or whisk in additional water.

Decorator's Icing
  • 1 8oz brick cream cheese, room temperature
  • 1 lb, 3 ozs powdered sugar
  • 1 cup white shortening
  • 1 1/2 tsp clear butter flavoring
  • 1 tsp almond extract
Cream all ingredients together in mixer, adding powdered sugar until at the desired consistency. Separate into individual bowls and add coloring, then pipe onto cakes as desired.

Total prep/cook time: 3ish hours, including decorating
Family happiness rating: 9/10. Mom thought the banana filling tasted too ripe, but BB was over the moon about it, and that's what matters.

Friday, January 27, 2012

52 weeks of cooking, Week 4: Tomato frog legs and shrimp, white wine risotto, stuffed mushrooms, and green peas

I am fuming right now.

It's rare that I get really angry with my family, but this is one of those times. I had a fantastic plan for this week's theme, which was pan frying - I was going to do duck breast with crispy skin in a fruity red wine reduction, a sweet potato gratin, and some brussels sprouts with bacon. It was going to be glorious - GLORIOUS, I tell you. And then, I noticed that frog legs were on sale at the grocery store. Now, my dad has often mentioned how much he likes frog legs, so I decided that I would do something for him and base a meal around them. After consulting my copy of Culinary Artistry and what few internet resources on frog legs I could find, I decided to serve frog legs in a diced tomato sauce, a white wine risotto, and some stuffed mushrooms. It wasn't plain old fried frog legs, but I don't cook that way on the evenings when I am cooking for my challenges. I don't do plain old ANYTHING, I do a full, carefully planned meal. In this case, I'd even told them EXACTLY how I planned on cooking the meal. I saw them in the grocery store as I was purchasing supplies for the meal. We even got the shrimp they asked for to supplement the frog legs, which I cooked in the same manner.

I couldn't even get a decent picture. It's that kind of day, I guess.


As soon as my dad (who I'd chosen the frog legs for in the first place) saw the finished product and started to fix his plate, he complained. "If I'd known you weren't just frying them, I would've bought more for myself," he says - a big sign of trouble. It was a quiet meal, for the most part. My mother commented on how everything was good but she didn't like the risotto, because the flavor was so strong (I thought it was still quite bland and was mixing in some tomatoes with them to bring in even more acid and depth of flavor, but I suppose 'wine' isn't a flavor they're used to). The mushrooms and peas were fine, at least... *grumble*

Honestly, I shouldn't have been surprised by it. My dad prefers everything to be deep fried and/or in gravy, or just beans and cornbread. My mom is more open minded, but wasn't thrilled at the idea of frog legs. Fine. Whatever. I'm not keen on salmon patties (the smell of which makes me want to vomit), or most fried fish. I don't eat organ meats, I don't eat eggs, I don't eat mayo - those are my few limitations, and they're not often respected. I should not have been surprised. I should not be angry.

But I am angry, and it's at myself. I should not have expected them to have an open mind, because they don't with anything else. They aren't adventurous with food as I am, and I should've found another audience to serve dinner tonight.

Pan Fried Frog Legs and Shrimp with Tomato-White Wine Sauce

  • 1 lb frog legs
  • 1 lb shrimp, peeled and deveined
  • Self rising flour
  • 1 can diced tomatoes
  • 1/2 cup white wine
  • Salt and Pepper to taste

Dredge frog legs and shrimp in self-rising flour, and allow to rest for five minutes. Re-dredge, and fry on medium heat in just enough olive oil to coat the bottom of a pan. Remove and place seafood on paper towels to rest. Drain off any excess oil, and add tomatoes and white wine to the skillet. Add salt and pepper according to taste, and allow the liquid to cook down for 2-3 minutes. Return seafood to the pan, and toss with tomatoes until the coating from the fried seafood creates a thin sauce with the wine and tomato juices.


White Wine Risotto

  • 3 tbsp olive oil
  • 2 cloves garlic, minced
  • 2 green onions, chopped
  • 4 cups cooked brown rice
  • 2 cups white wine
  • 1 cup vegetable stock
  • 1 cup fresh chopped parsley
  • 3-4 sprigs fresh thyme

In a large skillet, heat the olive oil, garlic, and onions over medium until they become slightly aromatic, then stir in rice. Heat the wine and stock over low heat, and add a ladleful at a time to the rice, stirring slowly until the liquid is absorbed. Stir in thyme and parsley, and repeat adding liquid until all liquid is used, or the rice will not accept any more liquid, about 30 minutes.

Stuffed Mushrooms

  • 1 lb whole mushrooms, rinsed
  • 1/2 cup breadcrumbs
  • 1/2 cup grated romano, parmesean, or asiago cheese
  • 1/2 cup finely chopped fresh parsley
  • 1 tbsp fresh thyme
  • 2 tbsp olive oil, plus additional for drizzle

Remove stems from mushrooms and chop finely, place caps in a small baking dish. Stir together chopped mushroom stems, breadcrumbs, cheese, herbs, and olive oil, then place spoonfuls in caps. Drizzle with additional olive oil, and bake at 400 for 20-25 minutes. Top with additional cheese if desired.


Total prep/cook time: 1.5 hours
Family happiness rating: 4/10, but I really could care less. My personal rating was an 8/10.

Sunday, January 22, 2012

52 weeks of cooking, Week 3: A trio of soups!

First of all, in the interest of full disclosure, I want to admit that I did -not- make the minestrone soup; my mom did. She had been craving minestrone for a while and decided to make some, and followed the copycat recipe for Olive Garden's soup pretty much to the letter. We discovered that it needed a bit more salt and more tomatoes, so we adjusted it and had a pretty nice dinner on both Friday and Saturday, and we still have plenty left.

Just because there was soup around the house didn't mean that I could skip out on this week's challenge, and so once Mom said that she wanted to make minestrone, we decided that I could make my own take on the zuppa toscana and my favorite roasted tomato soup to round out a trio of Italian soups, better-than-Olive-Garden's.

We played with plating this time around. Of course, Mom found a mini, flexi-tripod -after- I took all the pictures.


Completely forgetting that there was still some store-bought vegetable stock in the fridge, I got started with homemade stock by using up some asparagus ends that I'd been holding on to, as well as some carrot, onion, celery, and garlic. I then opened up a quart and a half of canned tomatoes from last summer's garden and put the tomatoes onto a baking sheet, tossed with salt and pepper, and roasted them in the oven to bring out their natural sweetness. Also, for some reason I decided to use the pre-ground pepper instead of cracking it fresh, like I usually do; of course, this meant that the shaker guard on the pepper would get stuck in the lid and that my tomatoes would end up getting a LOT of pepper on them.

Once the tomatoes were roasted, I put them in a pot and strained the seeds out of the reserved liquid, took the boat motor to it, then added just enough veggie stock to thin it down a touch. Since it's winter and I didn't have any fresh basil on hand, I had to go with a much higher proportion of dried basil.

For the potato and sausage soup (I really hate the name 'zuppa toscana'), I didn't do anything too spectacularly different from what you might find in any given knockoff recipe, except that I stuck to what greens were available in the garden. I grabbed some collard greens and some arugula, and decided to go with the arugula. Collards, having already sacrificed their place in the garden, were kept for some fun with photography and went back into the stock pot for more veggie stock. The soup itself is easy - just throw the vegetables into some chicken broth and simmer until the potatoes are almost cooked through, then add in the meat, then add in the greens toward the end and finish it off with a splash of half and half or cream.

I'm getting slightly better at this picture-taking thing, but this one is just so... white!


It was a good lunch, and there is now plenty of soup to keep us warm with all of the nasty weather that's going around.

Vegetarian Roasted Tomato Soup

  • 1.5 quarts (or one large can) whole or quartered tomatoes
  • 2 tbsp Olive oil
  • 2 cups vegetable stock
  • 2 tbsp fresh basil
  • 2 tbsp dried oregano
  • 2 tbsp fresh thyme
  • Salt and pepper to taste

Place the tomatoes on a baking sheet, reserving the liquid for later use. Coat with olive oil, salt, and pepper, and roast in the oven at 325 for 55 minutes. Transfer the roasted tomatoes into a pot, and strain in reserved liquid. Puree, then add vegetable stock and herbs. Simmer 30 minutes, adding additional herbs as desired.

Italian Potato and Sausage Soup

  • 2 big russet potatoes, diced
  • 1/2 large onion, diced
  • 3 cloves garlic
  • 2 cups chicken broth
  • 2 cups water
  • 1 pound Italian sausage
  • 4 slices bacon, chopped
  • 4-5 handfuls arugula, kale, or deveined collards
  • 1/2 cup half and half
  • Pepper to taste

Place the potatoes, onion, and garlic in a pot and cover with chicken broth. In a separate pan, cook sausage and bacon. When potatoes are nearly fork-tender, add the meat to the pot, draining off some excess fat if necessary. Taste broth, and add water until the salt and meat flavors are diluted to taste, add pepper if desired. Add greens and simmer at least 10 minutes more, longer if using collards. Stir in half and half before serving.

Total Prep/Cook time: 1.5 hours for vegetable stock and two soups
Family happiness rating: 7/10 - quality standard fare, but nothing we haven't eaten before.

See the full tomato soup album here.
See the full potato and sausage soup album here.

A quick-knit hat and scarf for Mom

First of all, let me just say that I despise moving with every fiber of my being. I've spent a good chunk of this week working on dissertation revisions and packing up my house (I'm putting everything into storage for a few months and staying with my parents until I move to Little Rock). I did, however, manage to do a bit of knitting and cooking.

Mom asked if I would knit her a rollbrim hat and scarf for some upcoming travel to colder climates, so last weekend, on our glorious kid-free visit to Hobby Lobby, she picked out a couple of skeins of yarn. We went with Bamboo Soft, a store brand that I really like the feel of. Bamboo is one of my absolute favorite fibers - it gets softer with wear, and as a renewable resource, it's very eco-friendly. She had picked a citrine green, as well as a print called 'citrusy' that was a mix of the same citrine, purple, and white.

I also use bamboo needles almost exclusively, because I love that little bit of grip they give, and the fact that I can break them in. Metal and plastic feel odd and slippery to me, and honestly, if I hadn't discovered bamboo needles, I would likely not have kept knitting as much as I do. Both the hat and scarf were worked on Clover size 10 needles.

Because she wanted a fuzzy brim to the hat, I worked in some Soft Delight (also a Hobby Lobby store brand) that I'd had in the stash for a few years, and showed it to her when it was a few inches along. She liked the look and the thickness, and since it wasn't too terribly thick, we decided that the entire hat should have the novelty yarn worked with it. I don't use a pattern for my roll-brims anymore, I just check my gauge versus the head circumference and round up (since hats usually have negative ease), making sure that my stitches are in multiples of 4. I set a marker at each quartile of the round, and once it's long enough, I start decreasing on either side of each marker. Once you have to switch to DPNs, you can pretty well intuit when to decrease. The whole thing took about 3-4 hours to complete.

The scarf was less complex - just a K2, P2 rib, with 22 total stitches so that it would be even. It's been a while since I've done more than just a few rows of ribbing, so it took me a bit longer than usual to get my groove going on it. That said, once I hit about the 8 inch point, the rest flew by, and the scarf was done in less than eight hours of TV watching. It's just shy of 60 inches long, and used the entire skein.

Doesn't she look happy with it?

Now I'm on a hunt for some good, cozy cotton yarn, because I plan to make the Shapely Boyfriend cardigan next. The biggest problem? Finding enough of a single dye lot in town! It's looking like I might be acquainting myself with KnitPicks yarn in the near future. But, there'll be more of that another day. Between now and then, the only project I have in the works is another pair of fingerless gloves for mom and the never-ending scrapghan.

Tuesday, January 17, 2012

Look what I got!

This grinder is from the 30s, and belonged to the parents of an older gentleman who sold it on Craigslist. I'd seen terrible reviews for the KitchenAid attachment, so in looking around for a better option I stumbled upon his listing. What a steal at $10!

I can't wait to grab a wire brush, clean this puppy up, and make myself a fresh burger.


Monday, January 16, 2012

Roasted chickpeas, where have you been all my life?

No, really. Where? I'm quite the southerner, so I've never really been exposed to chickpeas apart from hummus and that one time when my friend Trish's now-husband added them into a chili. Now, I've never -not- liked chickpeas, so I don't know why I didn't do anything with them before now, except that I just didn't.

This, my friends, is going to change. Roasted chickpeas are about to become a part of my diet.

And it was SUPER easy. I started with two cans of chickpeas, which I rinsed, drained, and rubbed with a paper towel. Rubbing between paper towels got the little husks off, which is very important. If you don't pull them off, you end up with chewy outsides to your chickpeas, which isn't good at all.

I used up what was left of a bottle of cajun shake seasoning, then mixed up some cayenne, garlic powder, salt, pepper, and smoked paprika with a little bit of olive oil, and tossed them all together, then into the oven they went! I cooked them for 30 minutes at 425 in a convection oven, but I think another 10-15 minutes would've made them even more crunchy and lovely.

So, so, very good.

People on the internet weren't lying, either - these things are REALLY filling. I was able to make it through a large handful before deciding that I couldn't eat any more. I'm planning to pick up more chickpeas tomorrow and roast a large bag with garlic and parmesan, because this batch is bound to disappear quickly.

Total prep/cook time: 50 minutes (10 mins prep, 40 mins roasting)
Family happiness rating: 8/10, but with a little more practice they could reach 10/10.

Sunday, January 15, 2012

52 weeks of baking, Week 3: White chocolate covered fruit biscotti and white chocolate banana cocoa

I've been wanting to make biscotti for some time, and this week's challenge seemed like a great excuse. I looked at a few different biscotti recipes, and took the difference of them all and decided to make my own, based of what fruits I had available and what I thought would go well with the white chocolate.

I only had just shy of an ounce of dried cranberries on hand, but I also had a secret weapon - freeze dried strawberries and bananas! BB loves the freeze dried apples that come in a big pack from Costco, but it also comes with mixed strawberries and bananas. She doesn't like strawberries for some unfathomable reason, so I decided to put them into action by adding in 2 bags (about an ounce), plus a couple of ounces of sliced almonds. I added them all in to the mix, and the flavors turned out amazing.

One thing I should note is that I doubted my intuition against the baking times on other recipes, and ended up very disappointed in what turned out, because the first bake didn't turn out as firm as I'd expected. I chalked that up to my inexperience with biscotti and ended up spending a lot more oven time on the second bake - lesson learned!

Once it was all, done, I dipped them in white chocolate, since that's the theme of the week, after all. I'd also come across a few recipes for white chocolate cocoa, and over the holidays my banana pudding white chocolate truffles had been a huge hit. So, I melted a few more white chocolate chips with what was left from the biscotti dipping, and tempered in some half and half and milk in the microwave (lazy, I know, but I didn't really want to get any more pots dirty tonight). I added in what was probably a teaspoon of banana extract, then warmed it a bit more - but not too much - and sprinkled some nilla wafer crumbs on the top.

I could have this every. single. night.


Let me tell you, this was a divine way to end a busy day of cooking and being with family. The cocoa was like a liquid dessert, and the crunchiness and fruity flavors from the biscotti I dunked in the cocoa really topped it all off.

I can go to sleep a happy girl now.

Fruit and Almond Biscotti


  • 1/2 stick butter
  • 3/4 c sugar
  • 1/4 tsp almond extract
  • 1 egg
  • 1 1/4 c AP flour
  • 1/2 tsp baking powder
  • 1/4 tsp salt
  • 1 oz dried cranberries
  • 1 oz freeze-dried strawberries and bananas (I used 2 individual packs from the Costco multipack of freeze dried fruit)
  • 2 oz sliced almonds
  • 1 egg white, beaten
Preheat oven to 350.

Cream sugar, butter, and extract in a mixer. Add egg, then flour, baking powder, and salt, then fruit and nuts. Add a few teaspoons of water if necessary to cause the dough to form up.

Shape dough into a log and place on a cookie sheet lined with parchment paper. Brush with egg white and bake 40-50 minutes, or until center is set, and allow to cool completely.

When cool, slice into wide slices. Place on the cookie sheet again, with the slices on their sides, and bake 10 minutes at 350. Flip and bake another 10 minutes. Continue baking 5-10 minutes per side until the cookies are dry and browned. Allow to cool completely.

Eat as is, or dip in melted white chocolate.


Total prep/cook time: 2 hours, 10 minutes: 15 mins prep/mix, 45 mins first bake, 30 mins rest, 40 mins second bake
Family happiness rating: unknown (they haven't tried it), but this is a 9.5/10 on my personal scale!

See the full album here.

Last night's supper: fire spiced beef, Copper Creek style!

I went to grad school at UGA, and Copper Creek Brewing is one of my favorite places in Athens. The last time I was in town, I HAD to stop and have the fire spiced beef appetizer I'd been dreaming of for ages, and I asked them how it was made. Sweet soy and sriracha, I was told. I finally found some sweet soy at an asian market this week, and so this evening it was destined to be my dinner.

This is what fire spiced beef looks like on Copper Creek's website, and it is divine.

Of course, I couldn't do just beef for a meal, and flank steak has gone through the roof, so I used what we had on hand to turn this into a meal. I started with about a cup or so of sweet soy, and added somewhere between 1/8 and 1/4 cup of sriracha (if you taste this before you use it, it will taste hotter than it will for the finish product). A tablespoon or two of worchestershire, some salt and pepper, and that's it! I cut up some beef (sirloin roast was all we had handy, so I cut it in a way that would yield short strands of meat for more tenderness), and poured the marinade over it in a bag for about 20 minutes, while I let the saffron rice cook.


The sour cream was just a few large spoonfuls of sour cream, plus a tablespoon or so of curry powder, a teaspoon or two of deli mustard to add a bit of bite to it, and a little turmeric to yellow it up a tiny bit more. I also prepped that while I was waiting on the rice.

It's cold out, so I cooked the meat in a skillet, then poured the remainder of the marinade over the top and let it thicken a little before serving. The extra sauce and the sour cream mixed together with the rice was a fantastic way to clean our plates!

The light betrays the yellowness of the sour cream, but let me tell you, it was delicious.

Total prep/cook time: 30 minutes
Family happiness rating: 7/10. I wouldn't feed this to the kids, and I had no good beer to drink with it. Otherwise, it'd be around an 8.5.

52 weeks of baking, Week 2: Mini deep dish pizzas

Just as with the first week of the 52 week cooking challenge, the first week of the 52 week baking challenge was a little 'meh'. The theme was brownies - simple enough, but I made butterscotch brownies, which is one of my dad's favorites that I used to make way back in high school. The recipe came from page 271 of the Betty Crocker cookbook, published in 1978, and although they were insanely delicious, I was pretty busy that day and trying to pack up my kitchen when I made them, resulting in me taking the self-rising flour shortcut plus being about two minutes late to get them out of the oven, so they rose... and fell.

Not only do I suck at photography, but I suck at making butterscotch brownies that don't fall, too!

The second week's theme was miniature, which isn't necessarily difficult to come up with in terms of baking, but it was definitely an issue for me to come up with something creative. I mean, mini-cupcakes are kind of boring. On Thursday, it finally came to me - pizza is baked, too! So, I decided to make mini deep dish pizzas, with the intent of testing out a pizza dough recipe for future use in my dad's pizza oven/smoker/firepit.

By the time 11:30 rolled around and I was ready to start lunch, my mom was also busy in the kitchen, so the idea of a new dough recipe went out the window. However, I always keep Jiffy pizza dough mix on hand - it's very inexpensive, it works very well for deep dish pizzas and breadsticks, and it's super quick. So, I mixed up a couple of batches of dough and pressed them into muffin tins. I pre-baked them for a few minutes, which is important, because this mix rises in the oven, not during a proofing cycle. After 3-4 minutes at 425, I took it out and pressed it back into the muffin tins, then added layers of sauce, pepperoni, and slices of the mozzarella-stuffed meatballs that BB and I made last week. 

More evidence that I'm terrible at the photography thing.

More shredded mozzarella went on top, and it all went back in the oven for about 10 minutes. It came out looking divine, and tasting delicious. Even the Chloe-pup thought so, when I dropped one on the floor and she got to nom away. The biggest complaint came from my dad, who prefers his crust a bit more brown, but I prefer it a little lighter and more bready, so that's not too big of a deal.


Caution: Food in photo is much more tasty than it may appear.


Total prep/cook time: 25 minutes per batch of 8
Family happiness rating: 9/10. Could be a little less saucy and messy, but otherwise these might become a go-to after school snack.

52 weeks of cooking, Week 2: Chinese food

I could post on week 1 of the challenge, but that was a very uninspiring challenge for me - eggs. I HATE eggs. The smell of a cooking or hard boiled egg makes me want to gag. There's nothing appetizing at all about how they look. I won't eat them, unless they're baked into something. So, for the last day of the holiday break, I cooked breakfast for my nieces to get this challenge out of the way, making french toast. I also made a fried egg sandwich for my dad. I suppose the pain is over, at least.

See? Even if I had any photography skills, that would not be appetizing at ALL.


At any rate, Week 2 went much, much better. The theme was Chinese food, and although I'm not particularly good at asian cuisine, I decided to go for it. The full meal was comprised of potstickers, mongolian beef, and chicken and vegetable lo mein.

The potstickers were a lot of fun. KB was home sick from school, so BB stayed home too. BB had been asking to cook again, so I decided that this would be the perfect project. I went to the asian market and picked up some dumpling wrappers and other assorted ingredients, then stopped at Publix for ground pork. I mixed ground pork with minced garlic, minced ginger, green onions, some soy sauce and sesame oil, and some shredded bok choi, and put it in the food processor just to get the veggies into smaller bits and well-integrated.

I'm soooo glad I'd bought that dumpling/ravioli/mini-pie press a couple of years ago! This was our first chance to use it and BB took to it like a pro. By the time she'd made about 3 dozen, she was calling herself the 'dumpling magician'. I cooked them simply by steaming them over high heat, and tried this 'dumpling sauce' I'd found at the asian market instead of making my own, as I normally do. It was roughly the same as what I would make at home, so that's nice for when we decide to raid the other two dozen that are stashed in the freezer!

My 'dumpling magician' definitely put some magic into these yummy things.


I also made some Mongolian Beef, based off of this recipe, but with the addition of broccoli and bok choi. Overall, it turned out excellent, but I think I would slightly increase the sugar-to-soy ratio next time. I've already been asked when I'm going to make it again!

Finally, there was the lo mein. I used this recipe that I'd seen someone else post on with good results as a starting point, but changed it up a bit. First of all, I replaced the linguine with some wider noodles marketed as 'Chinese wide lo mein' noodles, but the linguine probably would've done just as well. Second, I reduced the amount of chicken to 3 thin-sliced breast pieces and added a lot of vegetables. Peas and broccoli from the garden were at the ready in the freezer, and I also added in some slices of carrot as well as more bok choi. Instead of shiitake mushrooms I used beech mushrooms, which were adorable and very tasty. I also completely ignored the cooking procedures - cooking chicken, then putting it in a bowl, then cooking the veggies, then cooking the sauce and noodles and adding it all together was a ridiculous idea.

Overall, the meal was a huge success. In retrospect, I wish I'd been more thorough in reading the comments about the lo mein recipe and picked up some oyster sauce, which appears to be the missing 'secret ingredient'. I will agree that it didn't have exactly the same flavor as what you get in a restaurant, and although it was very good, it was just different enough for BB to notice.

You can't fake that kind of excitement.


Total prep/cook time: 2.5 hours, including dumpling assembly.
Family happiness rating: 8/10, they asked where the fortune cookies were!

See the full album here.

I guess it's time for me to blog.

With a semester away from teaching, my dissertation nearly complete, and having successfully navigated the job market, I've been doing a lot of catching up for lost time. In the past few weeks I've done tons of knitting, cooking, baking, and other various domestic adventures that I do for fun. I've also started participating in the 52 weeks of cooking and 52 weeks of baking challenges on Reddit, and have been trying my hand at getting better at food photography (and photography in general).

So why not? It might not be a bad idea to keep a blog, if for no other reason than to keep up with what I've done. If you've happened to stumble upon this, welcome, and feel free to read along!

Here's hoping for a successful adventure :)